Retrofitting Underfloor Heating: 4 Tips For Renovating Your Home
Underfloor heating is one of the most efficient ways to heat houses, and is becoming increasingly prominent in new build homes and constructions. But even if you have an older home with a pre-existing radiator setup, it’s possible to arrange an underfloor heating installation for older homes.
Combined with floor insulation, underfloor heating can significantly improve your quality of life. It can also improve your home’s Energy Performance Certificate rating and increase the value of your property as a result.
If you are looking to retrofit underfloor heating in your home, here’s our clear-cut guide to getting it sorted.
1 – Don’t DIY it.
Many builders’ merchants and suppliers offer materials for you to handle your own DIY underfloor heating installation. These might be mini kits that allow you to install underfloor heating for bathrooms and conservatories, or supplies you can purchase by the metre.
But there are many factors to consider when designing and laying underfloor heating that need years of experience to truly understand. Incorrectly installed underfloor heating can spring leaks or develop cracks in solid floors. If damp and vapour proofing is not done correctly, rising damp and condensation can damage your flooring and pipes.
Over the years, we’ve been called out to repair many botched floor heating systems. Often the only remedy was to reinstall it from scratch, due to:
- Poor pipe layouts creating cold and hot spots
- Uneven flooring
- Lack of damp proofing
- Faults resulting from the use of low quality materials
- Joints included in loops, that subsequently leaked
- Trapped air pockets and moisture that cracked the screed
Letting our professionals sort out the design and execution of your new heating system will help lift the burden from your shoulders. Not only can we prevent the problems listed, we design our systems to last long and ensure maximum comfort. We use high quality materials that come with guarantees should a fault occur, protecting you and your home from future headaches.
2 – Choose the right system
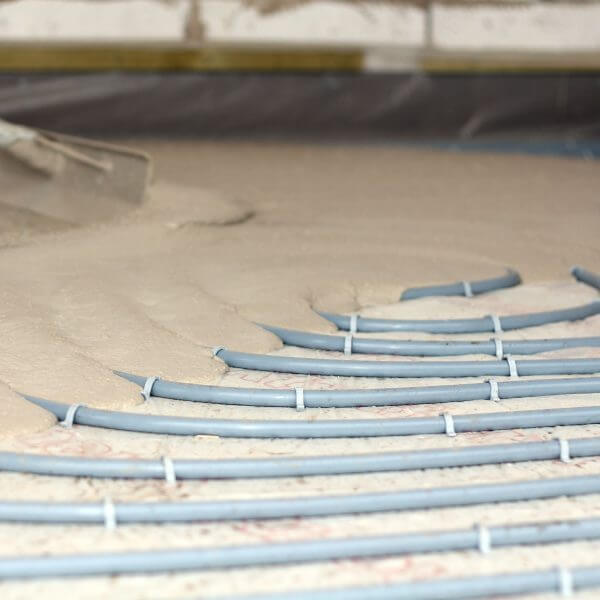
The first true step in your underfloor heating installation journey is to discuss with us which setup is right for your floors. Our most popular underfloor heating solution is designed for maximum efficiency on solid floors, with enough floor insulation to minimise heat loss. It increases floor height by a noticeable amount, which may not be ideal for rooms with low ceilings.
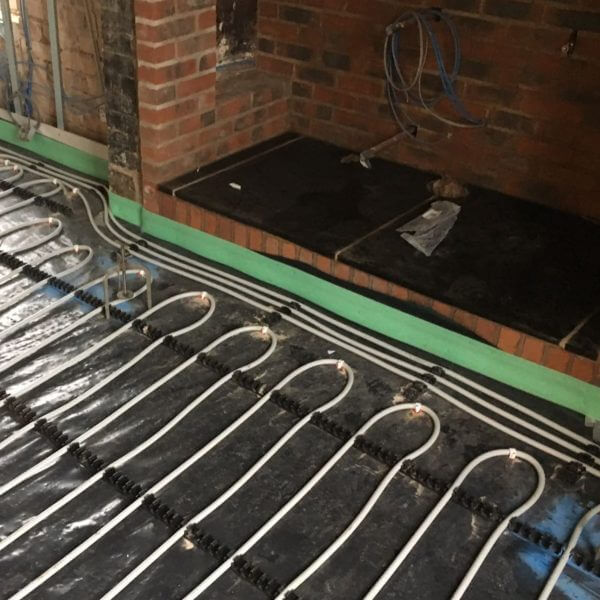
If that is the case, we can use backer board as an alternative, which is thinner floor insulation with grooves for pipes to lie in. It increases floor height by a minimal amount, and can be used with tiles, making it ideal underfloor heating for bathrooms with low ceilings. Because it doesn’t require floor screed, flooring can be laid directly after installation. However, we highly recommend using a 5mm levelling compound if you plant to have carpet or tiles laid over backerboard.
If you have a wooden ground floor, common in Georgian and Victorian era housing, a joist layout will be optimal for you. With our Easy Joist system, underfloor heating for wooden flooring is possible, and we’ve successfully retrofitted underfloor heating in older properties using it.
3 – Retrofit Underfloor Heating Section by Section
In order to install underfloor heating for bathrooms, kitchens, and bedrooms, the floor has to be laid bare. This is in order to access joists, put down a damp proof membrane, or level solid floors ahead of the pipework and floor screeding.
This is perhaps the biggest hurdle homeowners have in their aspiration to have the most efficient way to heat their house installed. Emptying rooms in an occupied house is a complex task, and many feel that they have to move out of the house in order to have renovations done.
That doesn’t have to be the case. We can work section-by-section in many instances, allowing you to remain in the property during retrofitting, depending on the layout and the system you are using. If you are having floor screeding laid, you may have to wait up to 7 days before it is dry enough to build upon.
Regardless, it is possible to fit heating in a property without vacating it entirely. In addition, a section-by-section approach can allow you to spread the cost of installation if necessary.
4 – Pair it with a Boiler or Heat Pump Upgrade
A wet underfloor heating installation will integrate with the majority of common hot water appliances. This includes gas, oil, or electric boilers, condensing boilers, and even heat pumps.
We can use your existing boiler if it is strong enough to supply the new pipe network. Considering that underfloor heating operates at a lower temperature than radiators, this is almost always the case. Even if you have heating in new areas, such as underfloor heating for bathrooms or extensions.
However, if your boiler is over 10 years old, or is inadequate for your current needs, we recommend a replacement. A new boiler or an upgrade to a heat pump is essential if you want to have the most efficient way to heat your home working to its fullest potential.
There are many schemes running in the UK, from boiler replacement grants to grants for heat pumps, which can help offset the cost of getting a new water heating unit. Many depend on your income, the age of your boiler, your home’s Energy Performance Certificate rating, and other factors.
If you require any more information or assistance, contact us today for a free consultation.

Where To Find Us