

Choose a Reputable Underfloor Heating Installer
We work with homeowners, commercial property managers and construction project managers to provide energy-efficient, smart underfloor heating systems across the UK.
![]()
Our Underfloor Heating 5 Step Process


What is Underfloor Heating?
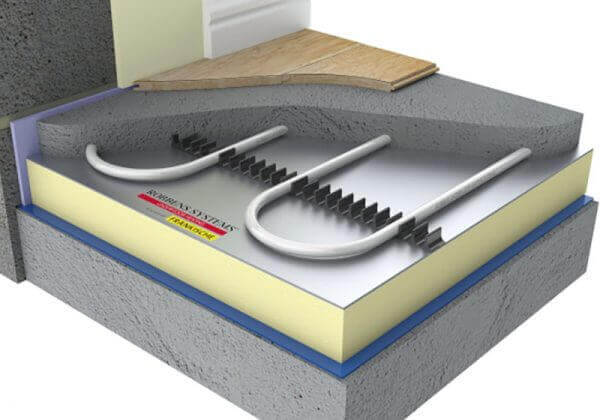
Underfloor heating is a radiant heating system that uses hot water pipes to distribute heat evenly across a room. It is installed inside the floor to provide heat from the ground up. It provides a more comfortable and even temperature throughout a building. Not to mention, it is more energy efficient than radiator or electric heating systems!
Underfloor heating is quickly becoming the modern, go-to central heating solution for residential and commercial buildings. Our underfloor heating installers are on hand to give you a no-obligation quote. Contact them today and start your underfloor heating journey.
Is Underfloor Heating Water or Electric?
It can be both. Water-based uses hot water pipes to distribute heat, whereas electric-based heats wires under the floor. Generally, wet underfloor heating is more energy efficient to run.
Is Underfloor Heating Expensive to Install?
Underfloor heating costs more to install than a brand-new radiator system, due to the labour involved. However, it is much more efficient than radiators and can provide cost-savings in the long-term.
How Much Does Underfloor Heating Cost?
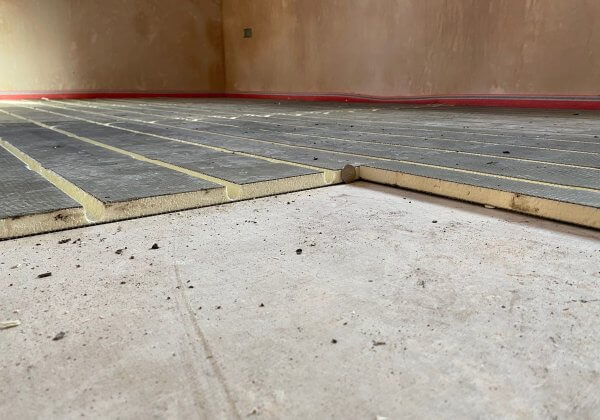
Underfloor heating installation costs depend on the building’s individual floor plan, the system used, smart heating system integrations, and other factors. Below are average prices for our underfloor heating installers fitting the Easy Standard system with supply of a smart heating system.
| 25 to 30sqm project £1,100 |
40 to 50sqm project £1,600 |
60 to 70sqm project £2,200 |
| 80 to 90sqm project £2,300 |
100sqm project £3,000 |
125sqm £3,550 |
All underfloor heating costs shown are indications only and are subject to a review of individual floor plans and other factors. Prices are also subject to the prevailing rate of VAT at the time of pricing. Included in the pricing are standard components, such as:
- Premium manifold with flow adjusters, mixing valves, actuators, and pump
- 16mm German manufactured Pert-al-Pert or PEX pipework, and pipe fittings
- Supply of Heatmiser Neo thermostats and wiring centre
- Manual, CAD drawings, and wire diagrams
- 500 gauge polythene separating membrane
- Perimeter edging expansion foam
Does underfloor heating add value?
Yes! Underfloor heating can make a property more desirable to buyers and improve its EPC rating, increasing the property value as a result.
Combine Underfloor Heating With Smart Heating Systems & Floor Screeding
Liquid floor screeding provides a fast, efficient, and robust floor covering for your underfloor heating pipes. The liquid screed flows around the pipes, forming a void-free finish that will help insulate and protect your pipes. Once dried sufficiently, it can be built upon, withstanding up to 30 tonnes per m² in weight!
At EasyFlow, we use the Heatmiser series of smart heating system controls. With smart controls, you can control individual room temperatures. This can help reduce your energy usage whilst increasing comfort and luxury in your home.
Does Underfloor Heating Work With Heat Pumps?
Yes! Heat pumps are highly compatible with underfloor heating. Heat pumps operate very efficiently at the low temperatures underfloor heating requires. In addition, with a heat pump, you can reduce reliance on nonrenewable energy sources, and power your heating with renewable options.
Both air source and ground source heat pumps work well with underfloor heating. EasyFlow can facilitate the installation of a heat pump on your property and integrate it with your heating to revolutionise how you heat your home.
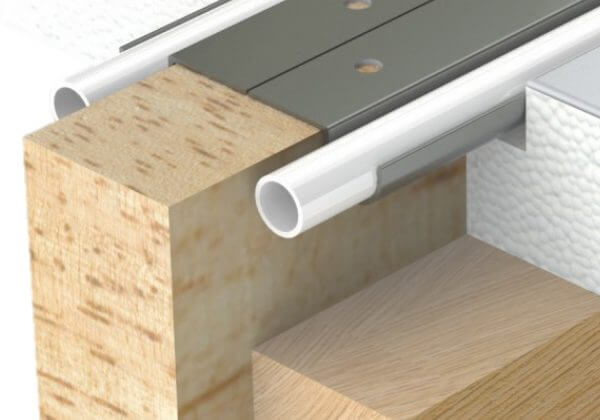
Get Underfloor Heating for Wooden Flooring Over Joists!
You can install underfloor heating for wooden flooring, tiled flooring, and carpeted flooring with one of our 3 installation systems. Each system is uniquely tailored to address the various flooring types present in UK homes and businesses.
Our Easy Standard is designed for solid flooring, and uses floor screeding to provide you with a solid foundation that will last for years. Easy Backer is best used where there is a limit on build height. And underfloor heating for wooden flooring is possible through our Easy Joist system. For more information on each system, click one of the following buttons below.
Complete the Form For a Quick Underfloor Heating Quote and Arrange a FREE Consultation
"*" indicates required fields

Where To Find Us